
Today, we're sharing this Quick-Sew Tote using our organic Charley Harper canvas, by none other than our good friend Christina McKinney. She's made this bag a useful sort for all of us gatchety folks. This tote bag includes a pocket perfectly sized for your iPad or tablet! We're throwing a party over that in itself. But it certainly doesn't hurt that this bag is a looker! Have a little look-see, and make one of your own!

So happy to be sharing another fun tutorial with y’all today! I
recently had a chance to work with the Charley Harper organic canvas line and
let me just tell you, it is AMAZING! The colors are so rich, the prints are
adorable...I could go on and on. And what better way to show off an amazing
fabric than with a tote bag? I’ve worked up a quick tutorial that is sure to be
a fast favorite. (And it’s reversible too!) With a few fun features like
piping, an ipad pocket, and this isn’t just an ordinary tote. Honestly, I don’t
think I ever really appreciated the value of a good tote until I became a mom.
Three kids later, I now know how great is is to be able to just toss a few
diapers, wipes, & my wallet in one bag GO! You can use them as a diaper
bags, beach bags, purses, shopping totes...you get the idea! And since they’re
so easy to make, you could whip up a few to share as well!

Notes before you get
started:
Many features of this tote can be customized to suit your
needs. I designed it with long straps to be worn cross ways, but the straps can
be lengthened/shortened as needed. Also, the inner pockets on one side are
sized to hold an iPad and smartphone, but can easily be adjusted for other
purposes.
All seam allowances are 1/2" unless otherwise
stated.
Supplies:
Main fabric - 1 1/4yd
Contrast fabric - 1yd
Piping - 1 package (You will need two 17in pieces)
Pellon® - 1/2yd (I used Décor Bond 809 )
Cut list:
Main fabric
2 - 2 3/4in X 28in (straps)
2 - 14in X 17in (upper outer body pieces)
4 - 11in X 17in (inner pockets)
Contrast fabric
2 - 7in X 17in (lower outer body pieces)
2 - 17in X 20in (inner lining pieces)
Piping
2 - 17in pieces (pocket accents)
Iron-on Pellon®
2 - 1in X 28in strips (straps)
Gather your supplies and lets get started!

You will first assemble the inner pocket pieces. Pin a length
of piping across the long side of one pocket piece, matching up the raw edges.
Baste in place.

Once piping is basted, lay the second pocket piece on top
(right sides together with the first piece) sandwiching your piping in between.
Sew this in place with the row of basting stitching showing to use as a guide
for stitching. You will position your new line of stitching just to the left of
the basting stitches. This ensures your piping will be firmly sewn in place.


Once sewn, flip your pocket piece wrong sides together and
press along the top seam. You should have a neat line of piping across the top
and 3 remaining raw edges.
Sew a line of stitching beneath your piping to secure your
seam. There’s no exact seam allowance measurement here, just sew with your
presser foot against the line of piping.


Repeat these steps for the second pocket assembly.
Once both pockets are assembled, you will baste them to your
lining panels. Start by laying one inner (contrast) piece down with right side
up. Lay your assembled pocket piece on top, right side facing up, matching up
your raw edges along the sides and bottom. Baste in place around all edges
except the top.

Repeat these steps with the opposite inner panel and pocket
pieces.
Once both your pockets are basted in place, you’ll need to
decide pocket sizes. I chose to do different sizes on each side of the pockets.
For the first side, measure 11in across the width of the pocket and mark the
line with chalk.

Next, topstitch along the chalk line from just under the piping
down to the basting stitches to form the pocket. (You may want to add a second
row of stitching 1/4 from the first for decoration and added durability.)
For the second pocket side, I simply folded the piece in half
to find the center and marked it with a chalk line as well. Stitch along this
line to form your second set of pockets. (I have found this size to be perfect
for holding diapers/wipes!) As I mentioned, you can easily change these pockets
sizes to suit your own needs.

This next step is important to help form the bottom of your bag
- Measure 2 1/2 inches from the bottom of your lining pieces and mark a
horizontal line in chalk. You will stitch along this line to form the pocket
bottom. Repeat with your second inner panel/pocket piece as well. (This
eliminates the dead space that would be at the bottom of each pocket once the
sides are formed.)


Now you’ll assemble the inner portion of the bag. With the
lining panels right sides together, pin the left, right, and bottom edges
making sure to match up the tops of your pockets on each side. Sew along those
three edges leaving the top edge open. The piping might be a little bulky on
the side, so stitch slowly over the spot where the two pockets meet.

Snip both corners making sure to not cut through your
stitching.

To box out the bottom of the bag, pinch the corners so that the
side seams match up. (It will form a triangle point.) You should be able to
nest your side seams together so that they match up exactly for this step.
Because of the snipped corner, you can make the seams lay opposite directions
to fit together better. Once your seams are matched, pin them in place.

Repeat this on the opposite side of the bag as well.

Using a ruler, measure 2 inches from the point and mark a chalk
line. You can use the side seam stitching as a straight edge to line up the
ruler.

Sew this line in place.

Trim the point about 1/4 from your stitch line.

Repeat these steps for the second corner as well. This is what
your bag corners now look like:

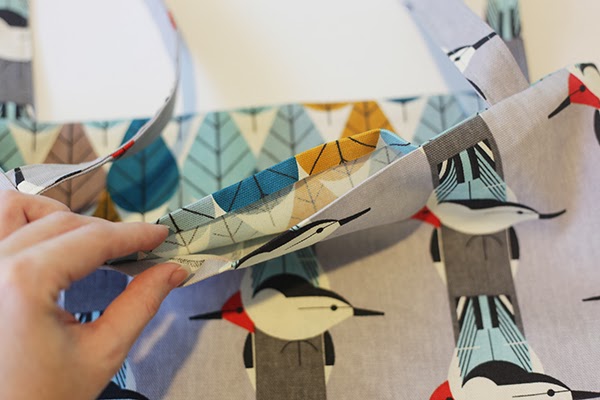
Next you will assemble your outer body panels. With right sides
together, sew one outer body upper piece to one outer body lower piece. Make
sure to orient them correctly so they don’t end up upside down! Repeat these
steps for both sets of outer panel pieces.

Press your seam toward the contrast side. Topstitch this in place 1/4in from the seam on the contrast side. The finished pieces should now measure 20in long.


With right sides together, pin your outer panel pieces together
leaving the top edge open. Be sure to carefully match up your seams.


You will now repeat the same steps as above to box out the
corners.


You should now have two formed bags with raw edges at the top.
Before you can finish your awesome bag, you need to assemble
your two straps.
Fold each of the long sides of your straps 1/4in toward the
wrong side and press. Do this down the entire length of the strap.

Now press the strips in half and create a center crease.

Lay your 1in strip of Pellon® on the inside on the strip, under
one of the 1/4in flaps. Iron in place.

Using a 1/4 seam, topstitch the long edge shut on each strip. Optional: Topstitch along both edges
for a more finished look. Repeat these steps for both strap pieces.

Almost done!
With your outer bag INSIDE OUT and your lining bag RIGHT SIDE
OUT, put the lining down inside the outer bag so that right sides are together.

Match up your side seams and pin in place.


Before you stitch them in place, you need to put in your strap
pieces. Decide where you want the straps to be and make a mark to line them up.
I measured 2 inches from the side seam and made a pencil marking.

(DO NOT stitch the straps on the outside like this. This is an
example of how they will lay between the layers.)

Line up your straps with your markings and insert them between the bag layers, making sure to not twist them. Pin them in place with about 1/2in showing above the bag edge.

Mark a start and stop point for your stitching between the
straps on one side of the bag. This will be your turning gap. (Be sure to
re-enforce your stitching on either side of the gap so that your stitches do
not pull loose when turning the bag right side out.)
Stitch around the top making sure to catch & secure all 4
straps.
Turn your bag right side out.

Once flipped, press the top seam making sure to fold under the
edges of your open turning hole.

Using a 1/4in seam, topstitch around the top of the bag. Optional: Add a second line of
topstitching for a decorative effect.

And there you have it, a tote! Now throw in all your stuff and
go show off your new bag!!

....................................................................................
Thanks for sharing with us Christina! Can't wait to whip some of these up! What are you using your Charley Harper canvas fabric for?

Your directions are so easy to follow, this is the first time I really understand how to construct the corners that will make a flat bottomed tote. Thanks so much for making this pattern available for free. I want it to carry my art supplies in as I no longer need to carry diapers.
ReplyDeleteBirchfabrics: Tutorial: Charley Harper Quick-Sew Tote {By Christina Mckinney} >>>>> Download Now
Delete>>>>> Download Full
Birchfabrics: Tutorial: Charley Harper Quick-Sew Tote {By Christina Mckinney} >>>>> Download LINK
>>>>> Download Now
Birchfabrics: Tutorial: Charley Harper Quick-Sew Tote {By Christina Mckinney} >>>>> Download Full
>>>>> Download LINK Su
Canvas tote bags Manufacturers in India. CoatBags is leading Canvas Totes suppliers, Canvas tote Exporters & Canvas tote wholesalers in India. We provide all kinds of Canvas bags, canvas tote and accessories from India.Contact us.
ReplyDeleteYou have written an amazing tutorial on tote bags. Looking forward to read more informative blog post like these.
ReplyDeleteWholesale Tote Bags
Get Assignment help is now easy. Get the best Assignment Expert here.
ReplyDeleteauditing assignment help
myob assignment help
psychology assignment help -
marketing assignment writing help
To box out the lowest of the bags & cases, tweak the angles so that the lateral layers match up. It will form a threesome opinion. You must be able to nest your side layers composed so that they competition up precisely for this stage.
ReplyDeleteBirchfabrics: Tutorial: Charley Harper Quick-Sew Tote {By Christina Mckinney} >>>>> Download Now
ReplyDelete>>>>> Download Full
Birchfabrics: Tutorial: Charley Harper Quick-Sew Tote {By Christina Mckinney} >>>>> Download LINK
>>>>> Download Now
Birchfabrics: Tutorial: Charley Harper Quick-Sew Tote {By Christina Mckinney} >>>>> Download Full
>>>>> Download LINK ty
The idea that do my essay canada area eyed on every sector like chaley harper festive sale was also on going project you'll see
ReplyDeleteHello, thank you for sharing such a golden information. It’s hard to find such information on internet.
ReplyDeleteNail Art Near Me
Experience the next generation of AI communication with ChatbotAI KR — a smart, fast, and intuitive assistant designed to help you with information, ideas, and everyday tasks. Whether you're exploring AI for productivity, creativity, or learning, this platform offers a seamless and user-friendly experience tailored for Korean users.
ReplyDeleteDiscover how AI can simplify your life, answer your questions, and support your goals with powerful features and real-time responses. 자세히 알아보기
Statistics students and professor are worried to find the deviation calculator because their work depends on it. klux busters jacket
ReplyDelete